January 31, 2009

FINISHED.............

I've finished the two jackets that I made for the FBLA Club at school with minimal mistakes (lol) which, may I add, I will not point out the recipients. One mistake was a 1/4" collar difference on the sides of one collar; the other happened because I neglected to read the instruction sheet and sewed and serged the facing to the sleeve cap before I placed and sewed in the shoulder pads. Oh well, because I am an avid jacket fan and the fact that I've worn many a RTW jacket, blazer etc., I know that I don't need to undo these two errors and do the work over again. I actually think they are fine just as they are.

I simply hate it when I give myself a time line
and I don't meet my expected due date. I had planned on starting the jacket construction last Friday evening - and that didn't happen. Then I had planned on having both of them finished and ready to present on Monday - well that didn't happen either. I worked on them a little on Monday, skipped Tuesday and Wednesday because I was just plain tired; worked a little on Thursday evening; finished hemming and thread cutting on Friday, and gave them a final press this morning. I must say I'm proud of my work and think both the jackets look really nice. I'll be able to take them in Monday coming.


Here's my project review. I just can't make a decision on joining pattern review yet.... I'm still thinking on that one.

My Project Recap:
Butterick 4138
  • The pattern contained all three of these notations: Fast & Easy; Very Easy; Two Hour Fast & Easy Sewing. I knew when I started that each jacket would take me more than two hours. If it takes you two hours to drive somewhere it will always take me three or maybe even four. However, if I were to make this jacket again I really do think it would only take me two hours.
  • Eight (8) pattern pieces used.
  • Loose-fitting, unlined, below the hip jacket has shoulder pads, collar, sleeves and button closure. I choose View B that had faux pocket flaps just to add some sort of detail to the jacket design.
  • Made the jackets in size 10 and size 12. After cutting I marked the size on each pattern pieces with chalk so I would not make the mistake of sewing the wrong sized pieces together, which help tremendously.
  • Fabric used: Lightweight Navy Blue Linen type
  • Notions I used: medium weight fusible interfacing, thread, one (7/8") button each and stretch lace for hems of sleeves and bottom of the jacket.
  • You know I ALWAYS have to add an extra little something to the garments I make. The only something I added here was stretch lace for the hems. I just think it makes a project a little more special when you add just a little something.
  • I might make the jacket again, maybe even for myself. I use to have one very similar in RTW that I wore with a matching straight skirt. Mmmm that gives me an idea, this might lead to a nice and easy put together for a spring suit. It was easy enough being unlined (although, it would be very simple to line this jacket if desired); and I think I've come up with a simpler way of constructing that notched collar that doesn't drive me crazy.
Now on with the show! I need to get some new pieces on the cutting board to start this weekends projects.....

January 27, 2009

HE GIVES ME THE DESIRES OF MY HEART...

It never ceases to amaze me... The things that God does for me that is. Just look at the wonderful gift that I received in the mail today from Carol. I can't link her here because she doesn't have a blog. But she does read mine!, and she noticed the sewing book dream list that I have listed at the bottom of my blog screen, contacted me and offered a duplicate that she had. The Singer Tailoring Book, two Threads Magazines (that I didn't already have in my collection) and a Vogue Pattern. This is so amazing! Carol, the books and pattern found a good home and I want to give a big SHOUT OUT of thanks to a sharing friend I didn't even know I had.


I haven't posted since last Tuesday, but I have been sewing. I'm making two of these. I agreed to make two jackets for girls in the Future Business Leader's of America organization at my school. When I was asked to make them, I was trying my best to say NO, but my mouth opened up and said yes. I had planned on starting them on Friday but that didn't work. So I worked on them Saturday, Sunday and Monday evening. They're made from a light weight navy linen-like fabric. No sewing tonight though cause I'm tired. All I have left is to sew up the sides/sleeves, sew on the buttons and hem both the sleeves and bottom hem. If all goes as planned I should finish both tomorrow night.


Well, that's all for tonight, nighty nite...got to go read my new books!

January 23, 2009

A GRACIOUSLY ACCEPTED AWARD

Today I was nominated for this award by Pamela and Cennetta. It is so nice to be recognized by your peers - I'm so glad that I have some peers (lol). So I proudly post my new award:


I visit so many blogs and all of these people are SO CREATIVE. I can't tell you how inspiring and educational they all are. Not a day goes by that I don't learn something new. Sewing blog surfing is an education in it's self. Here are links to some of the new blogs I've discovered recently as well as some that I've been visiting since I started blogging. Be sure to check them out:

  1. SEW SASSY AGAIN
  2. SEW MUCH TO SEW
  3. SEW ON AND SEW ON
  4. ALVIANA
  5. CLEVER GIRL
  6. LEARN TO SEW IN FLORIDA
  7. BACK PORCH BLESSNGS
These 7 bloggers have been notified of their nominations and if accepted these are the Rules and Responsibilities of the award--

1. Copy the award to your site.
2. Link to the person from whom you received the award.
3. Nominate 7 other bloggers.
4. Link to those on your blog.
5. Leave a message on the blogs you nominated.


I do so want to be a more creative person. I will use this award for inspiration towards that!

January 19, 2009

2009 GOAL #1 - ADD MORE COLOR

One of my sewing goals this year is to ADD MORE COLOR TO MY WARDROBE. I'm calling this my new Inauguration Jacket because I want to be feeling and looking my best when I return to work tomorrow; because we the people are very PROUD! We will watch TV from 12 to 1p.m. to see the President sworn in which is better than nothing at all.

This is the project I worked on this weekend and during a "Sew-A-Long" with LISA and EBONY; Lisa helped me in measuring and pinning my hems. We got a lot accomplished during the Sew A Long. It's THIS JACKET (double breasted view) in a turquoise butter suede type fabric with no stretch; it is so soft. To finish it today I needed to top stitch*, make 4 button holes and 4 covered buttons and sew on the buttons.

*One thing that I detest the most is - crooked top stitching! It just gives me the creeps! A lot of sewing resources suggest using an edge foot as a guide for top stitching, but of course none of my machines came with an edge foot; I need to try to order one for this purpose. But in the meantime I keep trying to invent the perfect method for straight top stitching. My magnetic seam guide always ends up moving making for crooked stitching. I also have a seam guide that screws into the bed of the machine, but could not adjust it to 3/8" for my top stitching. So, alas my solution is to cut a thick piece of 3M tape cut into a rectangular about 3" long and 1 1/4" wide. It sticks right to the throat plate, it doesn't move, and it's reusable. The results: straight top stitching and a very happy me.
As with so many others, this jacket pattern did not include an under collar, and because of that I could never achieve the proper turn of the cloth for my collars. I remembered ERICA describing tailoring techniques for collars in some of her recent coat construction, so I shot her an email and she answered right back with under collar advise. I think I will use this information for ALL collars for my jackets. Most patterns give only one collar piece that is to be used for both the upper and under collar so they are cut identical. Taking her advice I used the pattern piece to cut the upper collar on the fold exactly like the pattern calls for; but used the same pattern piece for the under collar but cut on the bias rather than the fold resulting in two pieces. The next step is to reduce under collar on three sides by 1/8" making it a tad bit smaller. This results is the beautiful turn of cloth that I knew I was supposed to be achieving but wasn't. The under collar issue was one the things I got counted off for on one of my entries at the National Fair last year so I really wanted to learn to handle that correctly.

The jacket is unlined, has in interfaced front facin
g and all seams are serger finished. Here's it is on my dress form; I will try to remember to take my camera to school tomorrow to get a junior photographer (aka a student) to take a picture of me in it.

Until then HAPPY MLK DAY!!!!


January 11, 2009

Second Project of 2009 Completed

I completed my second sewing project of the year last night. It's my first fleece project and the verdict is still out on whether I like sewing this material or not. Right now I'm thinking that I'm glad I didn't buy more of it. It has so much static, and ever available thread is attracted to it like a magnet and I got tired of that.

I was so attracted to a jacket that LISA made form this very same fabric that I wanted one too, so this is another copycat project. I did make a couple of changes so it wouldn't be exactly the same by adding a hood instead of the shawl collar, side seam pockets and covered buttons. I combined McCall's 5485 & McCall's 4975. I would have used just the M4975 pattern, but discovered that the pattern I had was way to big so I just adapted the pocket and the hood only from that pattern.


I know that lots of you have done covered buttons before, but I decided to do a little tutorial in case there's someone out there that is intimidated by them like I was because I wasn't sure I would be able to get the button properly covered so the raw edges of the fabric wouldn't show:

.The metal buttons come in a little kit, so you just pick the size you want and everything you need is in the kit - you just add the fabric. This kit contained two button backs and fronts as well as two plastic tools to press the buttons into place.
. There is a guide on the back of the package for cutting your fabric to fit the size button you've purchased.
. The fabric circle is then placed over the large plastic tool; followed by the button front. The fabric folds in perfectly to fit over the button front. Then the button back is put into position.
. The smaller plastic circle is used to press the button back into place after which the finished button is pushed out and that is all there is to it. No more covered button intimidation!


January 3, 2009

MY 2009 SEWING GOALS

But first...a mini fashion show...bedroom slippers and all (lol). Lisa took these photos for me after our "sew-a-long" on Sunday afternoon. Can you tell that I'm proud? I found water repellent spray to treat it with and it's supposed to rain tomorrow so I'll be ready to go.


So here's another look at the goals I've set for 2008, and what I did or didn't do with each one.
2008 SEWING GOALS

1. WORK ON COLLAR WITH BAND APPLICATION
Never did take the time to practice application.

2. LEARN WELT POCKET APPLICATION
Same here did not take the time to practice the application.

3. LEARN INVISIBLE ZIPPER APPLICATION

I did do two invisible zipper applications last year. However, I did not have the correct invisible zipper foot attachment. I tried to do it with a
piping foot which was ok, but still not accurate enough for me. I finally did purchase the right foot for one of my machines, but have yet to get around to using it.

4. EMBELLISH MORE
I didn't do much embellishment, just can't make up my mind on exactly what to do.

5. BITE THE BWOF BULLET
I made one BWOF skirt pattern. I did get around to tracing out another pattern but have yet to use it.

6. WORK ON NEW SEAM FINISHES (HONGKONG AND FRENCH SEAMS)
I've got that french seam down pat so it isn't scary to me any more. I've used the HongKong seam finish just a little bit on the facings of jackets; but I still need to experiment with this finish more.

7. WORK ON TNT PANTS PATTERN

I worked with a McCall's shorts pattern that I lengthened to make several pairs of capri's and a pair of pants. I will continue my search for THE pants pattern in the new year.

8. BEEF UP SEWING SPACE
I purchased:
. a gravity fed steam iron (this thing I really love)
. a coverstitch machine (now I get really a professional look on knits and hems)
. a cutting table - which is just the right height although not long enough, but it really is a big help for my back when cutting.
. I installed wall shelving (money gifted from my sister Brenda). They've really helped with organization.
. Bought a 3-light pole lamp for $5.00 at a yard sale. I love this thing too. I'm always on the lookout for something nifty for the sewing room.

9. 6 PIECE MINI SWAP
I actually sewed a mini swap from my stash during the summer for my vacation. And almost finished another one during my fall sewing.

10. NO UFO'S

Ok, the verdict is still out on this one. I have one pattern cut out (pattern still attached to fabric). I think other sewists call this a UFO. But is it an UFO if you never actually started to sew it.

So what are the plans for 2009:

1. Add more COLOR to my wardrobe.
Lori posted a great site to help with this one, it's www.insideoutstyle.blogspot.com.
www.etceteraclothing.com is another one.

2. Schedule time monthly for ACTUAL practice sessions on these techniques:
.
collar with band applicaton
.welt pocket application
.invisible zipper application
.hong kong finishes
.bias tape making and application

3. Experiment more with BWOF patterns.
This means that I will have to purchase a magazine every now and them.

4. Make my Channel Suit from the fabric my Mother gave me.
Ann has already sent me information for my Channel jacket.

5. Back to the quest of finding the perfect pants pattern.
Simplicity has two new ones that Lisa says are the bomb so I've got to give them a try. And I finally bought Vogue 1051 that Adrienne swears by.

That's all for now; I may add a few more as I go along or even delete one of them... we will see.

January 2, 2009

HAPPY NEW YEAR YA'LL (long post)

Since I haven't posted since December 20th I have a whole lot to say, but first of all let me say "HAPPY NEW YEAR" to all my contacts in sewing land. I need to let you know that during 2008 you provided me with: sewing information, knowledge, advice, motivation, encouragement, inspiration and much entertainment! You allowed me to peek into your sewing, family and personal lives. You allowed me to travel from state to state and even abroad (Thank you Paco) while sitting here (often in my PJ's). So as I look back over the year past I owe you a great big THANK YOU!

I really have been itching to post...but I did want to have something to show when I did. Well, FINALLY I do have a show and tell; I FINALLY finished the none ending project of my animal print rain coat! I so wanted to finish it in 2008, but it just didn't happen. What with trying to finish up my math class (if you can imagine a grandmother reluctantly taking three - yes three Algebra classes in one year), the quarter ended on Dec. 17th; and my birthday which was Dec. 18th and all of the nice people who wanted to do nice things for me, I just had to put the sewing aside (DO YOU KNOW HOW HARD THAT WAS?). I know that we need to have lives beyond sewing, it is a MUST for proper balance; but sewing or just being in the sewing room has actually helped save my sanity. It allows me to put away the stress of my hustle-bustle life, and what seems like work to others-is actually fun and calms me down.

That brings to mind the question "JUST WHAT DOES SEWING DO FOR YOU"? So can I hear from others in sewing blogdom on this????? I ask because so
often I find myself explaining WHY I do what I do - Why do I Sew - Why do I spend so much time with it; and I tetter back and forth from trying to explain it to people who don't (can't) or (just won't) understand; to becoming slightly angry because people seem to always be asking me about the time I spend with it; to wanting to avoid anyone who doesn't have a passion for the craft (now that would really limit my person to person contact and would not be practical or mentally healthy).......
This is what sewing does for me:
. As I said it relieves stress and calms me down . Allows a creative outlet since I truly believe that God made us co-creators with him so we are supposed to be creating something. I am not a happy person unless I am involved in creating something. .It is also a company keeper. It actually keeps me from concentrating on the fact that I am alone. And being as involved with people who share my craft as I am (via the internet and my sewing buddies) I am not alone any more. .It allows me to wear new and fashionable clothing that fits much better than RTW. . It gives me a chance to stretch and use my mind. . It is an never ending learning process.

I guess I needed to vent. It's too bad that the people who think that I need a rest from sewing sometimes won't actually be reading this (because they also show no interest in blogging) I still needed to get it off my chest. So you know what?, rather than just sitting on the couch eating bonbons, watching TV and getting fatter, I'M GOING TO CONTINUE SEWING TO MY HEART'S CONTENT, as long as the Good Lord affords me the use of my hands to cut, sew, and maneuver fabric and my eyes to thread a needle! So there!!!! CAN I GET AN AMEN!

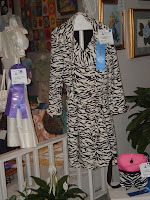
Now back to the rain coat. I did some snoop shopping during the holidays and noticed that EVERY store (even WalMart and Lane Bryant) had cute 3/4 length rain coats as I call them (they're probably just what we use to call spring jackets when I lived in New York and there you really need a spring jacket every year). Every color, every style. Double breasted, single breasted, some embellished, animal prints and jeweled toned. I guess I'm really on time with mine. I've wanted one every since my friend Lisa made her's last year. Here it is as her entry at the Georgia National Fair with a first prize ribbon.
I combined parts of two patterns to come up with my rendition taking most of the style from the Butterick pattern because I thought the it looked too plain. I took the pocket flaps, sleeve tabs, and belt loops from the Simplicity pattern and I even added a belt buckle although it didn't show in the pictures.

Here are some pictures that I took during the various stages of construction. I decided to interface the entire coat to give the fabric a little more body, and I'm glad that I did.


So to all out there, wishing you a healthy, happy and prosperous New Year and many GREAT sewing adventures!

Paying Homage to Black Pattern Designers...

...for years February has been set aside as a special time to learn about and recognize accomplishments of African Americans and other peopl...